2TIFF is a command-line utility that batch converts various file types to TIFF format. The basic syntax requires only source and destination switches after 2tiff.exe. Since the program doesn't have a traditional GUI, you can run 2TIFF commands from any command-line interpreter like Command Prompt or Windows PowerShell.
- How to quick start batch conversion
- Сommand line structure
- Switches
- Common options (-options)
- TIFF format parameters (-tiff)
- Operation parameters (-oper)
- -oper removeblankpages
- Post-processing action (-postproc)
- File loading settings (-fls)
- Load custom 2TIFF Settings file (-inipath)
- Information (-info)
- Command lines (-cmdlines)
- Default 2TIFF Settings
How to quick start batch conversion
Open the Windows Command Prompt by pressing Win + R combination on your keyboard, then type in cmd.exe and press Enter:
You can use Command Prompt or another command language interpreter that's comfortable for you to use.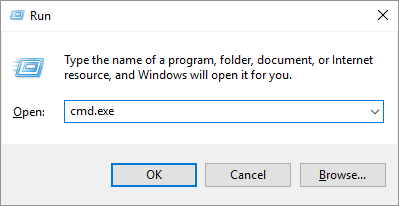
- Add switches and parameters after 2tiff.exe. The basic command is as follows:
2tiff.exe -src "C:\In\*.*" -dst "C:\Out"
- -src stands for a source for files. It can be a path to a folder or a single file, or a list (a .txt with file paths). Examples: -src "C:\In\*.*"; -src "@C:\Files\list.txt"
- *.* is a mask that must be added after the folder path so that 2TIFF can process any files from a specified location. *.* means any filename – point – any file extension. Asterisk (star, *) is a wildcard character which stands for any string of characters (or no characters at all);
- -dst should be followed by the destination for output files. For example: -dst "C:\Out"
- Press Enter to execute the command. All files from the source (-src) will be converted in batch mode.
Сommand line structure
The command line string can contain as many switches and parameters with values as needed. 2TIFF command line structure looks like this: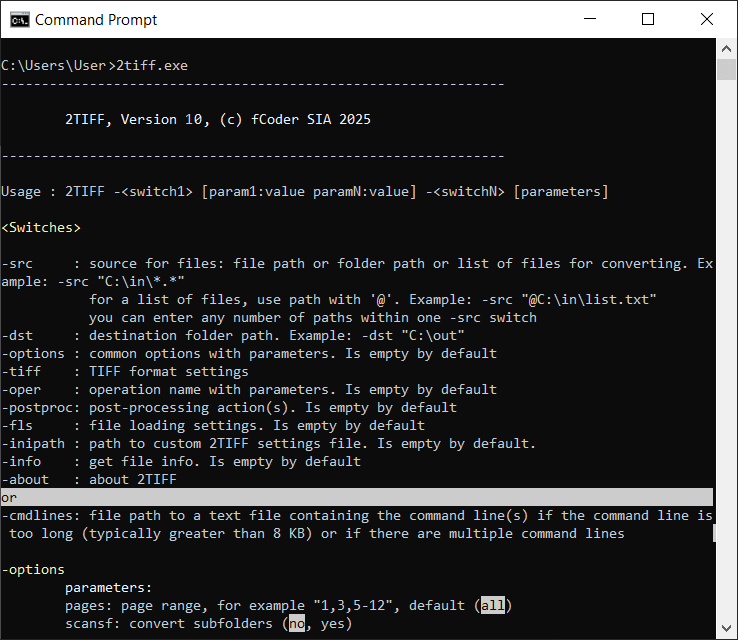
Switches
Use switches to set source and destination for files, select additional operations, configure common options, and more. You can enter several parameters (parameter:value) within a single switch, separated by space.
| Switch | Description |
|---|---|
| -src | Source for files. A source can be:
This switch should be followed by the source folder path where files are located, or path to a file, or path to a list, enclosed in double quotation marks. For a folder as a source, you can filter input files by mask, e.g., *.pdf. To allow processing any files, use *.* To set a list of files as a source, use @ before the file path. A list must consist of file paths with each path on a separate line, and it should be saved in TXT format. You can use multiple sources at once – enter them after -src one after another within double quotation marks, separated by a space. For example: -src "C:\In\*.*" "E:\Files\*.pdf" "@C:\Lists\list.txt" When using a web address (URL) as a source and the website requires login, you may need to set a password using the -options password switch. |
| -dst | Destination folder path. For example: -dst "C:\Out" When using this switch, input the output folder location within double quotation marks. |
| -options | Common options. Define common 2TIFF options, such as page range selection, processing files in subfolders (recursive scan), attachments handling, silent mode, and more. See section Common options (-options) |
| -tiff | TIFF format parameters. See section TIFF format parameters (-tiff) |
| -oper | Operation parameters. Various operations can be applied to the files, such as watermarking, resizing, rotation. See section Operation parameters (-oper) |
| -postproc | Post-processing action. Copy, move, or delete files automatically after processing, if necessary. Can apply both to successfully converted and failed files. See section Post-processing action (-postproc) |
| -fls | File loading settings. Define how specific file types must be handled. See section File loading settings (-fls) |
| -inipath | Load custom 2TIFF Settings file and execute a command with previously saved INI file. See section Load custom 2TIFF Settings file (-inipath) |
| -info | Information about a certain document. See section Information (-info) |
| -about | Information about the program. Shows license key and software version. |
| -ini | Advanced settings available in the 2TIFF low-level settings editor. See section Advanced settings |
OR
| -cmdlines | Allows to run 2TIFF command(s) from a TXT file. This can be helpful when the command is very long or if you want to run several commands sequentially. Example: 2TIFF.exe -cmdlines "C:\Scripts\Commands.txt" |
Command line examples:
Common options (-options)
pages: Set page range for files to be converted [+][-]
Default value: all
Defines single pages or a page range for files that should be converted.
To select pages from the end of the document, use the expression "last" (last for the last page, last1 for the penultimate page, etc.). For example: 1,5,last2,last1,last
Example:
scansf: Scan subfolders [+][-]
Values:
yes (default value), no
Scans subdirectories and converts files from them, too (subfolder recursion).
Example:
keepsf: Restore structure of subfolders in the output folder [+][-]
Values:
yes (default value), no
Keeps the same subfolder structure as in the input folder (if a folder is set as a source).
Example:
mswildc: Enable/disable Microsoft DOS/Win32 wildcard matching algorithm [+][-]
Values:
yes (default value), no
Enable/disables Microsoft DOS/Win32 wildcard matching algorithm.
This algorithm is a bit different from the "expected" behavior, since some wildcards work in a different way in Windows (compared to Linux, for example). Suppose, you want to convert DOC files only. It would seem that you should just use this command:
2TIFF.exe -src "C:\In\*.doc" -dst "C:\Out"
But as a result, both .DOC and .DOCX files will be converted, which is not needed.
To convert only files that match the specified file extension, disable the Microsoft wildcard matching algorithm. To do that, use the command:
overwrite: Overwrite existing output files [+][-]
Values:
no (default value), yes, skip
Overwrites existing files or skips files with the same filename.
Example:
ocf: Overwrite combined PDF/TIFF file [+][-]
Values:
append (default value), createseparate, overwrite, skip
Specifies how to handle existing PDF/TIFF files in the output folder when combining files with matching filenames (these may be files created during previous 2PDF sessions as well).
Example:
break_on_error: Stop the program on error [+][-]
Values:
no (default value), yes
Stops the file conversion process in case of an error.
Example:
template: Use a filename template for output files [+][-]
Default value: {*SrcFilename}{*WorksheetName}{*SrcFileMPageNo}.{*DstFileExt}
Automatically renames output files using a name template. By default, pages counter ({*SrcFileMPageNo}) appears only for multipage files split into separate pages.
Available macros:
{*SrcFilename} – source file name;
{*WorksheetName} – worksheet file name (for Excel and CAD source files only);
{*SrcFileMPageNo} – source file page number;
{*DstFileExt} – destination file extension.
Example:
srcpwd: Enter source file password(s) [+][-]
Lets 2TIFF convert password-protected Word and PDF files. Enter a password in this format: srcpwd:password.
If a password contains spaces, input it between double quotation marks.
Example: srcpwd:"my password".
If you have files secured with more than one password, you can enter multiple passwords too.
Example: srcpwd:password1 srcpwd:password2 srcpwd:password3.
Example:
res: Set resolution for image rasterization [+][-]
Values:
300 (default value), 72-4096
Define rasterization resolution for output TIFF files from 72 DPI to 4096 DPI. Use this variable if you convert vector documents (PDF, Word DOC, etc.) to TIFF. The default value is set to 300.
Example:
attachments: Set up the processing of file attachments [+][-]
Values:
ignore, separate (default value), combine
If you convert documents with attachments (e.g., correspondence with email attachments, PDF Portfolio files), you can select how 2TIFF should handle them:
- ignore – do not convert attachments
- separate – save attachments as separate files
- combine – add attachments after the main document
Example:
sort: Sort files by a specific parameter [+][-]
Values:
unsorted (default value), name, date, type, size, path, name_d, date_d, type_d, size_d, path_d
You can sort the output files by a specific parameter, such as name, date, type, size, or path. To sort the files in descending order, use values ending with _d (name_d, date_d, etc.).
Example:
log: Enable log output [+][-]
Values:
yes (default value), no
Create an events log. This parameter saves system information and 2TIFF events in XML-formatted log files. We recommend enabling this feature, as these logs may help our developers quickly diagnose and resolve any issues that may occur.
Example:
logpath: Set path to log files location for the log parameter [+][-]
Values:
%TEMP% (default value)
Set path to log files location for the log: parameter. By default, it is %TEMP% which usually opens the path "C:\Users\[User]\AppData\Local\Temp".
Example:
reslog: Create a plain text report listing all processed files [+][-]
Values:
none
Create a report containing a log of converted files (both successful and failed, if any) during this session by specifying the TXT file path.
Example:
silent: Suppress console output [+][-]
Values:
no (default value), yes
Suppresses console output and runs file conversion silently without showing the process. The console window's information will not be displayed during processing, and dialog windows will not appear.
Example:
alerts: Display alert windows [+][-]
Values:
yes (default value), no
Displays alerts in case of an issue or error. If set to "no", you will not see any dialog windows, such as asking to register the program's license (if the free version is used). However, the information on the console window will be displayed during processing.
Example:
user: Enter username (login) [+][-]
Values:
yes (default value), no
Enter username (login) for converting a web page – when URL is set as a source and if password entry is required to access the web page. Don't forget to specify both credentials – user and password.
Example:
password: Enter password [+][-]
Values:
yes (default value), no
Enter password if password entry is required to access the web page you want to convert (URL is set as a source). Don't forget to specify both credentials – user and password.
Example:
TIFF format parameters (-tiff)
bpp: Set bits per pixel [+][-]
Values:
64, 48, 32, 24 (default value), 8, 4, 1
Define TIFF image color depth (bits per pixel). The number of bits is used to define the grayscale value or color value of a pixel.
Example:
leave_cs: Leave the original color space as it is (if possible) [+][-]
Values:
no (default value), yes
Preserve the original image's color space when possible.
Example:
compression: Select algorithm of TIFF image compression [+][-]
Values:
auto (default value), none, rle, fax3, fax4, lzw, flate, jpego, jbig, jpeg, packbits
Applies the method of TIFF image compression for output files.
Example:
jpeg_quality: Set quality of output TIFF image(s) when using JPEG compression type [+][-]
Values:
85 (default value), 20...100
Sets the compression quality for output files if JPEG compression method ("JPEG-in-TIFF compression") is used.
Example:
jpeg_sample: Set sampling for JPEG compression type [+][-]
Values:
111 (default value), 422, 411
Sets type of JPEG compression sampling if JPEG compression method ("JPEG-in-TIFF compression") is used.
Example:
flate_level: Set level of Flate compression in percents (20-100) [+][-]
Values:
70 (default value)
Adjusts the compression level using the Flate compression method.
Example:
multipage: Set multipage option [+][-]
Values:
split, asis (default value), append, prepend
Combines source files into multipage TIFFs or splits large files into single pages.
Multipage options:
- as is – keeps the original file structure
- split – splits multipage files into separate TIFF files
- append – adds new files as pages to the end
- prepend – adds new files as pages to the beginning
Example:
combine: Enter a filename for combined file [+][-]
Default value: combined.tif
Defines the name of the output multipage TIFF file. You can enter any name before .tif. If you want to use more than one word with spaces, type it within double quotation marks. For example: "my multipage.tif"
Example:
byte_order: Select byte order [+][-]
Values:
little_endian (default value), big_endian
Switches between little-endian byte order (low order) and big-endian byte order (high order).
Example:
thumbnail: Create thumbnails [+][-]
Values:
no (default value), yes
Creates thumbnail images for output files.
Example:
strip: Select strip structure [+][-]
Values:
multi (default value), single, tiled
Defines image strip structure for converted files.
Example:
hres: Set custom horizontal resolution (DPI) [+][-]
Values:
Default value: asis
Changes horizontal resolution to a custom DPI value.
Example:
vres: Set custom vertical resolution (DPI) [+][-]
Values:
Default value: asis
Changes vertical resolution to a custom DPI value.
Example:
save_meta: Save EXIF data [+][-]
Values:
no (default value), yes
Saves EXIF metadata in output TIFF images.
Example:
save_iccprofile: Save ICC profile [+][-]
Values:
no (default value), yes
Saves ICC profile of source image.
Example:
big_tiff: Convert to BigTIFF format [+][-]
Values:
no (default value), yes
Uses BigTIFF (a TIFF format variation that supports large image files). We recommend using this feature if you have "heavy" files to convert so that output TIFFs can be up to 4 GB or more. Please note that not all commonly used image viewers are able to open BigTIFF files.
Example:
quant: Set image quantization level [+][-]
Values:
8, 7, 6, 5, 4, 3, 2, 1, 0 (default value)
Quant parameter reduces the number of distinct colors used in an image while preserving visual quality.
Example:
dither: Use dithering [+][-]
Values:
yes (default value), no
Applies dithering – a method that creates patterns of available colors to emulate colors of adjacent pixels eliminated during the color quantization process.
Example:
photometric_mono: Toggle photometric interpretation [+][-]
Values:
asis (default value), min_is_white, min_is_black
Toggles the photometric interpretation for a monochrome (bi-level) image.
Example:
fill_order: Select fill order option [+][-]
Values:
msb2lsb (default value), lsb2msb
Defines whether bits are not reversed before being stored or not. In practice, the use of lsb2msb is very uncommon and is not recommended.
Example:
predictor: Use LZW/Flate predictor [+][-]
Values:
yes (default value), no
Uses a compression predictor for LZW and Flate compression methods. With this parameter enabled, data can be encoded more compactly.
Example:
Operation parameters (-oper)
-oper watermark
image: Set path to image watermark [+][-]
Sets path to watermark image. Example: "C:\Watermark.png"
Example:
pages: Set page range for image watermark [+][-]
Default value: all
Defines the range of pages on which the watermark will be placed. By default, the watermark is added to every page.
To select pages from the end of the document, use the expression "last" (last for the last page, last1 for the penultimate page, etc.). For example: 1,5,last2,last1,last
Example:
halign: Set horizontal alignment for image watermark [+][-]
Values:
left (default value), center, right
Aligns image watermark horizontally: to the left, center, or right side of a sheet. Can be combined with other alignment and offset parameters.
Example:
valign: Set vertical alignment for image watermark [+][-]
Values:
top (default value), center, bottom
Aligns image watermark vertically: to the top, center, or bottom of a sheet. Can be combined with other alignment and offset parameters.
Example:
units: Select units for horizontal and vertical offset values [+][-]
Values:
pixels, percents (default value)
Uses percents or pixels as horizontal and vertical offset units.
Example:
offx: Set horizontal offset value [+][-]
Default value: 0
Shifts the pages' position horizontally using a specific value (in pixels/percent of the page width). Can be combined with other alignment and offset parameters.
Example:
offy: Set vertical offset value [+][-]
Default value: 0
Shifts the pages' position vertically using a specific value (in pixels/percent of the page width). Can be combined with other alignment and offset parameters.
Example:
size: Set watermark size [+][-]
Values:
-1 (default value), 1-100
Sets watermark size as percent of source file's page height and width. For example, enter size:15 for 15%. -1 is the default value, which applies the watermark "as is" using watermark's original size.
Example:
angle: Set watermark rotation angle [+][-]
Default value: 0
Rotates the watermark at a specific angle. The rotation is counterclockwise by default.
Example:
method: Select a blending method for watermark [+][-]
Values:
alphablend (default value), overdraw
Sets a blending method for watermark – AlphaBlend or Overdraw.
Example:
-oper textwatermark
pages: Set page range for text watermark [+][-]
Default value: all
Defines the range of pages on which the watermark will be placed, e.g., pages:1,3,5-12. By default, the watermark is added to every page.
To select pages from the end of the document, use the expression "last" (last for the last page, last1 for the penultimate page, etc.). For example: 1,5,last2,last1,last
Example:
text: Enter watermark text [+][-]
Input any text within double quotation marks.
Example:
font: Select font [+][-]
Default value: Arial
Applies a specific font for text watermark.
Example:
fontsize: Set font size [+][-]
Default value: 12
Sets size of a watermark font for text watermark.
Example:
fs_units: Select font size units: points or percents [+][-]
Values:
points (default value), percents
Switches between points or percent (percent of image height) for specifying font size.
Example:
bold: Make font bold [+][-]
Values:
no (default value), yes
Uses a bold version of a font for a text watermark.
Example:
italic: Make font italic [+][-]
Values:
no (default value), yes
Makes font for a text watermark italic.
Example:
underline: Make font underlined [+][-]
Values:
no (default value), yes
Makes font for a text watermark underlined.
Example:
halign: Set horizontal alignment for text watermark [+][-]
Values:
left (default value), center, right
Aligns text watermark horizontally: to the left, center, or right side of a sheet. Can be combined with other alignment and offset parameters.
Example:
valign: Set vertical alignment for text watermark [+][-]
Values:
top (default value), center, bottom
Aligns image watermark vertically: to the top, center, or bottom of a sheet. Can be combined with other alignment and offset parameters.
Example:
units: Select units horizontal and vertical offset for text watermark [+][-]
Values:
pixels, percents (default value)
Sets horizontal and vertical offset units: percents or pixels.
Example:
offx: Set horizontal offset for text watermark [+][-]
Default value: 0
Shifts the watermark's position horizontally using a specific value (in pixels/percent of the page width). Can be combined with other alignment and offset parameters.
Example:
offy: Set vertical offset for text watermark [+][-]
Default value: 0
Shifts the watermark's position vertically using a specific value (in pixels/percent of the page width). Can be combined with other alignment and offset parameters.
Example:
color: Set text color for text watermark [+][-]
Default value: "r:0,g:0,b:0,a:255"
Applies text color using RGBA color model – "r:(0-255),g:(0-255),b:(0-255);a:(0-255)".
Example:
bgcolor: Set text background color for text watermark [+][-]
Default value: "r:255,g:255,b:255,a:255"
Applies text background color using RGBA color model – "r:(0-255),g:(0-255),b:(0-255);a:(0-255)".
Example:
angle: Set text watermark rotation angle [+][-]
Default value: 0
Rotates the text watermark at a specific angle. You can select any arbitrary angle.
Example:
direction: Select direction of rotation for text watermark: CW or CCW [+][-]
Values:
ccw (default value), cw
Sets direction for watermark rotation (clockwise or counterclockwise).
Example:
border: Draw border around text watermark [+][-]
Values:
no (default value), yes
Adds a border around the text watermark.
Example:
fit: Fit into image [+][-]
Values:
no (default value), yes
Fits the watermark into image.
Example:
method: Blending method [+][-]
Values:
alphablend (default value), overdraw
Set a blending method for watermark – AlphaBlend or Overdraw.
Example:
zorder: Change Z-order [+][-]
Values:
foreground (default value), background
You can insert the watermark behind (background) or in front (foreground) of the document's contents.
Example:
txt_margin: Text margin in font units [+][-]
Values:
0,0,0,0 (default value)
Set the size of margins around text, in font units. This can be useful when you're enabling bgcolor or border parameters.
Example:
-oper resize
pages: Set page range for resize operation [+][-]
Default value: all
Defines single pages or a page range for files to be converted and resized.
To select pages from the end of the document, use the expression "last" (last for the last page, last1 for the penultimate page, etc.). For example: 1,5,last2,last1,last
Example:
size: Set new size of the image (width and height) [+][-]
Default value: "0 0"
Defines width and height dimensions (in pixels) for file resizing. The source file proportions are kept.
Example:
units: Select units for setting resize values [+][-]
Values:
pixels (default value), percents
Uses pixels or percents as units for resize operation.
Example:
fmode: Select Fit mode [+][-]
Values:
fit_in_size (default value), thumbnail, fit_width, fit_height, fill_in_size, none
Applies page scaling to fit a specific size. Available values:
- fit_in_size – Fit the size specified for the size: parameter. Oversized images will be shrunk to the defined width and height, and small ones will be enlarged to fit the page size;
- thumbnail – Fit the size of a thumbnail;
- fill_in_size – Fill the size specified for the size: parameter. The image will be positioned on the entire sheet by the smaller side (the longer side may go beyond the defined area);
- fit_width – Fit the size specified for the size: parameter by width;
- fit_height – Fit the size specified for the size: parameter by height.
Example:
falign: Select Fit alignment [+][-]
Values:
center (default value), left_top, right_bottom
Aligns the resized image to the center, left top corner, or right bottom corner.
Example:
nozoom: Enable/disable making image larger than original size [+][-]
Values:
no (default value), yes
Allows image upscaling to meet the defined size dimensions. Disabled by default.
Example:
method: Select image resampling method [+][-]
Values:
bilinear (default value), neighbour
Applies the nearest neighbor or bilinear interpolation resampling method for image resizing.
Example:
color: Fill blank margins around the resized image with color [+][-]
Default value: "r:255,g:255,b:255,a:255"
Fills blank margins around the resized image (if there are any) with a certain color using RGBA color model – "r:(0-255),g:(0-255),b:(0-255);a:(0-255)".
Example:
-oper crop
method: Select method of image cropping [+][-]
Values:
margins (default value), rect2p, rect_pwh, autocrop
Applies a specific image cropping method.
Example:
left: Set left margin value [+][-]
Default value: "0"
Sets the left margin that is used for margins and rect2p cropping methods, in pixels.
Example:
top: Set top margin value [+][-]
Default value: "0"
Sets the top margin that is used for margins and rect2p cropping methods, in pixels.
Example:
right: Set right margin value [+][-]
Default value: "0"
Sets the right margin that is used for margins and rect2p cropping methods, in pixels.
Example:
bottom: Set bottom margin value [+][-]
Default value: "0"
Sets the bottom margin that is used for margins and rect2p cropping methods, in pixels.
Example:
width: Set width of cropping rectangle for rect_pwh method [+][-]
Default value: "0"
Sets the crop width for rect_pwh cropping method, in pixels.
Example:
height: Set height of cropping rectangle for rect_pwh method [+][-]
Default value: "0"
Sets the crop height for rect_pwh cropping method, in pixels.
Example:
color: Set color sample for autocrop method [+][-]
Default value: "r:255,g:255,b:255,a:255"
Applies color code for the autocrop method using RGBA color model – "r:(0-255),g:(0-255),b:(0-255);a:(0-255)".
Example:
tolerance: Set tolerance value for autocrop method [+][-]
Default value: "0"
Applies tolerance value for autocrop method (0-100%). Tolerance parameter specifies the allowed deviation from the color sample specified in the previous color parameter.
Example:
-oper mirror
flip: Define the direction of image mirror flipping [+][-]
Values:
vertically (default value), horizontally, both
Flips the output image in a selected direction. Available values: vertically, horizontally, or both ways – horizontally and vertically at the same time.
Example:
-oper rotate
angle: Define the angle of image rotation [+][-]
Values:
0 (default value), 0-360
Rotates the output image to a certain degree (0-360°). The rotation is clockwise by default.
Example:
direction: Select the direction of image rotation: CW or CCW [+][-]
Values:
cw (default value), ccw
Sets direction for image rotation (clockwise or counterclockwise).
Example:
color: Set background color for image rotation [+][-]
Values:
ccw (default value), cw
Applies background color around the rotated image (using the RGB color model).
Example:
-oper grayscale
You can select the grayscale mode for output TIFFs by using -oper grayscale.
Example:
pages: Apply Grayscale mode to a specific page range [+][-]
Values:
all (default value)
Set page range for the Grayscale mode.
Example:
-oper sharpen
radius: Сontrol the size of the sharpening area for sharpen filter [+][-]
Values:
5 (default value), 0-250
Controls the width of the sharpening lines, in pixels.
Example:
amount: Control how much the contrast should be increased for adjacent pixels [+][-]
Values:
100 (default value), 1-500
Sets the number of pixels for the sharpen filter. Amount controls how strong you want the sharpening to be.
Example:
threshold: Control the minimum brightness change that will be sharpened [+][-]
Values:
3 (default value), 0-255
Controls the balance between detail and noise. Threshold can be used to sharpen more pronounced edges while leaving subtler edges untouched.
Example:
-oper brightness
percent: Adjust brightness correction [+][-]
Values:
10 (default value), -100...100
Controls the level of brightness of output images, in percent.
Example:
-oper contrast
percent: Adjust image contrast correction [+][-]
Values:
0 (default value), -100...100
Controls the contrast of output images, in percent.
Example:
auto: Adjust image contrast automatically [+][-]
Values:
yes (default value), no
Applies auto contrast adjustment.
Example:
-oper gamma
percent: Adjust image gamma correction [+][-]
Values:
0 (default value), -100...100
Controls the contrast of output images, in percent.
Example:
-oper smoothingnoise
You can use the Smoothing Noise operation to apply noise reduction for output TIFFs via -oper smoothingnoise.
Example:
-oper autolevels
You can use the Auto Levels operation to correct the tonal range and color balance for output TIFFs via -oper autolevels.
Example:
-oper autorotate
orientation: Auto-rotate images to portrait or landscape [+][-]
Values:
portrait (default value), landscape
Automatically rotates images to portrait or landscape orientation.
Example:
direction: Set direction of image auto-rotation: CCW or CW [+][-]
Values:
ccw (default value), cw
Sets direction for image rotation (clockwise or counterclockwise).
Example:
-oper paint
cmd: Draw a rectangle on the output image in the form of an outline or filled with color [+][-]
Values:
fillrect, drawrect
Adds a rectangle on the image. To choose between an outline or filling with color, use painter commands: drawrect, fillrect
Example:
rect: Set rectangle position [+][-]
Default value: "0 0 -1 -1"
Sets the rectangle position on the output image file in the "x0 y0 width height" format, where:
- x0 – shifts the page position horizontally from the top left corner (0.01 inch);
- y0 – shifts the page position vertically from the top left corner (0.01 inch);
- -1, -1 – are the original file's width and height calculated automatically (defaults).
You can keep the default value "0 0 -1 -1" to add a rectangular outline to the TIFF image(s).
Example:
pen_color: Select pen color (outline color) [+][-]
Default value: "r:0,g:0,b:0,a:255"
Adjusts the outline color of a rectangle. Enter values using the RGBA color model.
Example:
brush_color: Select brush color (fill color) [+][-]
Default value: "r:255,g:255,b:255,a:255"
Adjusts the fill color of a rectangle. Enter values using the RGBA color model.
Example:
pen_width: Set thickness of rectangle's frames [+][-]
Default value: 1
Controls the thickness of the rectangle's frames.
Example:
units: Select units for drawing a rectangle [+][-]
Values:
pixels (default value), percents
Uses pixels or percents as units for -oper paint operation.
Example:
-oper removeblankpages
pages: Set page range for this operation [+][-]
Values: all
Automatically detects and removes blank pages within the specified page range.
Example:
pt: Set pixel threshold (0-100%) [+][-]
Values: 0.5
Automatically detects and removes blank pages and applies a pixel threshold to detect blank pages.
Example:
ct: Set channel threshold (0-100%) [+][-]
Values: 4 (default value)
Automatically detects and removes blank pages and applies a channel treshold to detect blank pages.
Example:
Post-processing action (-postproc)
Using the -postproc switch, you can control what should be done with the original files automatically after processing: do nothing, move or copy to another location, or delete.
passed: Select action for successfully converted source files [+][-]
Values:
none (default value), copy, move, delete
Selects the action to be performed with successfully processed source files: do nothing, copy/move to another folder, or delete.
Example:
passed_dir: Set path to the destination folder for copy/move action, for converted source files [+][-]
Specifies a folder where successfully converted source files should be moved or copied.
Example:
failed: Select action for source files that failed to convert [+][-]
Values:
none (default value), copy, move, delete
Selects the action to be performed with source files that were not converted for some reason.
Example:
failed_dir: Set path to the destination folder for copy/move action, for failed source files [+][-]
Specifies a folder where failed source files should be moved or copied.
Example:
keepsf: Keep the original subfolder structure for post-processing actions [+][-]
Values:
yes (default value), no
Restores the original subfolder structure in the location specified when using "Copy" or "Move" post-processing actions.
Example:
output: Select action for output TIFF files: keep or delete [+][-]
Values:
keep (default value), delete, delete_all
Selects an action to be performed with output files. You can use values:
- keep – to keep all output files;
- delete – to remove only failed files;
- delete_all – to delete all files if at least one was unable to convert.
File loading settings (-fls)
-fls excel
esm: Export Excel scale mode [+][-]
Scale mode defines page sizing and scaling of Excel sheets. Available options:
- original — keeps the original size of Excel sheets
- fit — scales small pages up and shrinks large pages down to fit the output file page format
Example:
-fls imageraster
iccprofile: Apply an embedded or external ICC color profile [+][-]
Define what to do if the source image has an embedded or if you have an external ICC color profile for it. By using the image's embedded or external color profile, you can achieve more accurate printing with the reproduction of actual colors. Here are the possible options:
- ignore — do not use profiles, any color profile is ignored
- embedded — use image's embedded color profile (if it exists)
- external — use an ICC profile that can be specified via the ICC profile filepath setting
- embedded_non_rbg — use image's embedded profile if it's not RGB (may increase processing speed)
Example:
iccpath: Set path to an ICC file containing an external color profile [+][-]
Values:
none (default)
Set path to an ICC file containing an external color profile. Use together with Color profile action: iccprofile (see previous parameter).
Example:
Load custom 2TIFF Settings file (-inipath)
The -inipath switch lets you execute a command with previously saved custom 2TIFF Settings. You can save these settings using the Export button, which creates a "2Tiff-settings <date>.ini" file. Loading a settings file applies specific default settings for 2TIFF operation.
Example:
Information (-info)
pagecount: Get the number of pages of a file as executable's exit code [+][-]
Generates a code with the number of pages contained in a single file as executable's exit code. For example, Page count=5.
Example:
Command lines (-cmdlines)
The -cmdlines switch lets you specify a TXT file containing one or several commands to execute. This is useful for managing long commands, commands that need frequent editing, or running multiple commands in sequence. To use this switch, set a path to the TXT file containing the commands, each on a separate line. Once you run the sample command below, the commands from your text file will be executed one after another. For example:
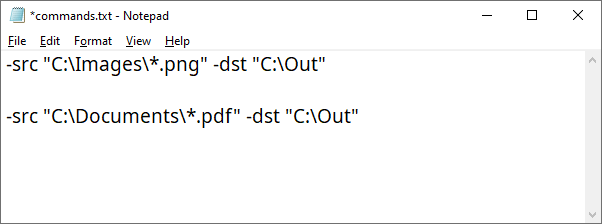
Commands can start with -src, and you don't need to enter 2tiff.exe. You can add other switches and their parameters after the destination switch if needed.
Default 2TIFF Settings
Some advanced settings are available in the 2TIFF low-level settings editor. With it, you can adjust the default settings of 2TIFF. To access it, run this command:Learn more about 2TIFF Settings

With its command line syntax, 2TIFF adapts flexibly to your needs, delivering fast and efficient image conversion and processing — no matter how many files you're working with. You can freely combine and modify the command line switches values mentioned above, as they work in any order. Need help creating commands for 2TIFF? Contact us.